Urban Mermaid Designs

Sunday, 22 November 2015

Watercolour Card

Here is a clean and simple card that I made, inspired by the fashion challenge over at Runway.

It is based on their inspiration image of this dress by Banana Republic.

I painted some navy cardstock with deeper navy watercolor mixed with gesso to create that deep blue/black background of the dress.
I wanted to represent the flower design with watercolors.

I used a resist paper by Cosmo Cricket and cut up 3 square pieces.


And painted with watercolours in blue and purple shades.
 I liked the purple tints in the dress, so I used a Versamark dazzle pad to run glue across the background of the card. I then embossed it with Lindy's Stamp Gang Angel Wings Ruby. This is a clear powder, with an interference mica, so that it shines purple in different lights and on different colour backgrounds.
The Dazzle pad has a silver/white shimmer base.


Supplies:
Cosmo Cricket - Just Add Watercolor 12 x 12 pad
Spectrum Aqua Pens
Lindys Stamp Gang - Angel Wings Ruby embossing powder
Papermania - navy card stock
Clear gesso

Challenges:

Country View - The Colour Blue
Ribbon Girl - Use any Image
Runway Inspired Challenge -  ric#96 Banana Republic

Saturday, 21 November 2015

Marilyn Monroe Christmas Card


Today I am sharing a hand-made Christmas card inspired by some online blog challenges.
 

The first inspiration is a sketch challenge over at Make the Day Special, this is a UK shop that has some great US imports that are unavailable elsewhere. (e.g. the Winnie & Walter stamps and glues used)
Here is the sketch for their current Christmas Card challenge:

I also remembered a Marilyn Monroe stamp that I had, and thought that would work perfectly with the theme "World's Greatest" for the Craft Barn weekly challenge. Ie: Marilyn was the world's greatest film star.
The stamp is part of a set all based on sketches by Hollywood costume designer William Travilla.

 
As Marilyn is dressed in her costume for the number "Diamonds are a Girl's Best Friend" from Gentlemen Prefer Blondes, I decided to go with a diamond/Christmas bling theme.

I thought the diamond accents in the scrapbooking set Bella Rouge by Pink Paislee would work well with the theme and color scheme.


And also working well with the theme are My Precious stamps by Winnie and Walter.

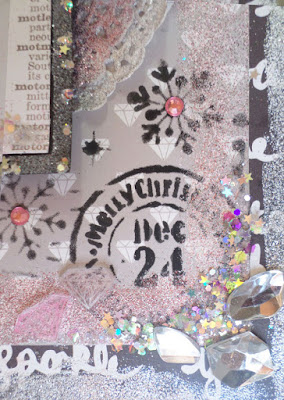
I  stamped some diamonds onto Shrink plastic using pigment ink in silver and pink. Then cut them out and using a heat gun, shrunk them down and stuck them on using clear glue dots. First I tried using embossing powders, but the heat gun melted the powder again during the shrinking process, turning the diamond into a silver nugget!


I stamped some background sparkles onto the tag, using versamark, then embossed them with silver powder.


I went round the edge of Marilyn with a glue pen, then sprinkled Chloe's Ice Maiden Glitter over it. I also did this in the bottom corner.
 

I made the tag from black cardstock and used an eyelet punch to make the hole. 
I went along the edge of the tag with a chisel tip glue pen, then applied fine clear glitter (Tim Holtz rock candy or CS Diamond snow) I also dotted a few bits of chunky glitter on top.

 I covered 2 doiles in Versamark, then heat embossed them with WOW! powders. This makes them look super glam, but also very durable, as doilies are prone to tearing. The Rose Mist has a white pearl base with 2 tone pink fine glitter and the Icicle has a white base with silver glitters.
 The edges of the card are embossed with the WOW! powder in Rose Mist.
Then I used a black  ink and a Christmas stencil to create snowflakes. I added a pink gem in the centre for added bling.


 I used Spectrum Aquas to colour in the stamp.


Supplies:
Pink Paislee Bella Rouge Scrapbooking paper, ephemera
WOW! Embossing Powders: Rose Mist, Icicle, Silver
Stamps: Personal Impressions: Marilyn Monroe by Travilla
Winnie and Walter: Big Bang Confetti and My Precious clear stamps
Stencils: Viva Decor Steampunk Christmas
Spectrum Aqua watercolour pens

Diamond gems - The Range
Shrink Art - Crystal Clear Shrinkies
Cardstock: Silver Mirror Card, black card
Small white doilies embossed with Versamark and Wow powders
Glitter: Stamps by Chloe Sparkelicious Ice Maiden, Cosmic Shimmer -Diamond Snow
Zig 2 way glue pen


Challenges:
Make the Day Special - Nov Xmas Card Sketch Challenge (22/11)
WOW Embossing Powder - Anything Goes with lots of Wow powder (Rose Mist & Icicle)
Craft Barn - World's Greatest - Film Star = Marilyn Monroe! (22/11)
That's Crafty - Black and White with a Hint (of Pink) Challenge
As You Like It    Season Challenge My favourite season is WINTER as it's full of sparkle and shine!
Live and Love Crafts Christmas Tic Tac Toe Challenge GLITTER (lots of it!) SNOW (Snowflake diecuts & stamps) STAR (confetti stars and FILM STAR!)
Deep Ocean White and one other Colour PINK (30/11)
Creative Inspirations  ~336 Festive Fun Challenge
Bunny Zoe Crafts Sparkle Nov/Dec Challenge(9/01)
Sweet Stampin   Star Challenge - confetti glitter stars, stamped stars and a movie STAR!


Monday, 9 November 2015

Decorative Christmas Sleigh Dies

It's that time of year again! I have been looking for a decorative sleigh die to use on winter / Holiday / Christmas cards and home decor projects.

I though I'd post a list of those I have found with dimensions to help anyone else deciding which one to buy. 

Five of these will even fit the new mini die-cutting machines Spellbinders Sapphire and Tattered Lace Baby Blue.

The perfect sleigh can then be teamed up with presents, reindeer, horses, Santa Claus or even the Snow Queen and cut in miri board or embossed with powders or covered in glitter and snow effects.
Tonic Rococo Santas's Sleigh 1015E 
Dimensions/Size: 4" x 2.5" (103.5mm x 60mm)

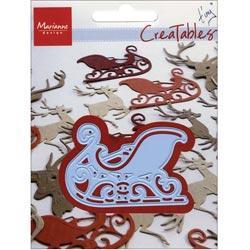
Marianne Creatables Santa Sleigh
 Dimensions/Size: 1.5" x  2.5" (40mm x 65mm)
Spellbinders Holiday Collection Shapeabilities Reindeer and Sleigh Set
Dimensions/Size: Reindeer: 2.10" x 3.60", (53mm x 92mm).
Sleigh: 4.10" x 2.75", (104mm x 70mm)

Die-namites Merrry Sleigh DN-1206
Dimensions/Size: 3 3/16" x 3" (80mm x 76mm) 
Tattered Lace Sleigh 
Dimensions/Size: 3.5" x 2.5" (90mm x 62.5mm)

Sweet Dixie Santa's Sleigh SDD003
 Dimensions/size: 4" x 2.5" (100mm x 60mm)

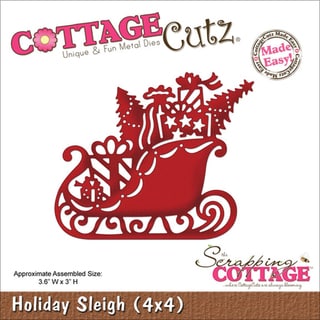
Cottage Cutz Holiday Sleigh
3.6" x 3" ( 92mm x75mm)

Cottage Cutz Winter Wonderland Sleigh
Dimensions/Size: 3.6" x 2.5"(95mm x 65mm)


Wednesday, 4 November 2015

Day of Dead Project

Where did October go?! Here is a mixed media piece I created for Halloween, based on the Mexican sugar skull traditions for their Día de Muertos (Day of the Dead).
While looking through my scrapbooking stash, I noticed a chalkboard paper with the banner "don't forget to smile" on and thought it would be fun to add it as an ironic sentiment to my Gothic image. I thought it would work well with the portrait as a kind of "Day of the Dead" high school yearbook concept.

I started with this 4 x 6 paintables card by Prima:
I painted a base of white gesso and then had fun decorating the face with inks, pens and glitter to create a Sugar Skull makeover.
Using Tim Holtz and Tattered Lace dies I created the headdress. I also used Wow embossing powder in Vintage Peacock on the flowers.
 I added some self-adhesive black pearl swirls.
 Close up of the Wow embossing powder in Neutral Ultra Shimmer
 I made a web strand with clear glue, dusted in embossing powder. I found the spider in a mixed pack at a pound store. I now have a hundred other spiders to use somehow!
 I embossed the Tonic flourish die in Angel Wings Peacock embossing powder. This is clear on white card, but transforms on black. The roses are a quilling die cut from Marianne.


 The somewhat tongue-in-cheek banner. Cut from Prima's Optimist paper.

 Detail of the Marianne rolled flower die cuts, finished with glitter and inks.

Close up: Wow Vintage Peacock embossing powder on black card, gives a textured, silver and blue glitter effect.
 

Supplies:
Prima Marketing Bohemian 4"x6" Paintables
Prima Optimist - You & Me 12 x 12 paper
Santoro Mirabelle 6 x 6 paper
Dies:
Cheery Lynn - Spider Web, Memory box - Spider web border, Tonic- floral swirls fancicul flourishes,
Marianne - Branch and roses, Tim Holtz - mini tattered florals, Spellbinders Die-D-lites Ivy, Tattered Lace - Foliage
Tim Holtz distress inks,Spectrum Aqua Pens
Embossing Powders:
Wow! Vintage Peacock and Neutral Shimmer, Lindy's Stamp Gang - Angel Wings Peacock
Hobbycraft black pearl swirls
Dovecraft glitter glue (like Stickles)
IOD for Prima - Build-a-Frame stamps, dictionary and script stamps on leaves.
Spider - pound store!
White gesso for face

Challenges:
Country View - Blue
That's Crafty - Haunted Halloween
Papertake Weekly - Anything Goes
Lost Coast Portal to Creativity - Day of the Dead
Wow Powder - Anything Goes
That Craft Place - Anything Goes Mixed Media
Dream in Darkness - November


Monday, 12 October 2015

Mini Paper Parasol and Tag Project

Sharing a little red and black paper parasol and tag that I made with some scrapbooking supplies.


To make a paper umbrella or parasol, the basic method is to fold a paper circle into 8 segments.
You can then glue a rod or thin pencil wrapped in ribbon to the centre.
I added a red voile ribbon to the handle to finish it off.
To make the Victorian style frill, I edged it the parasol with adhesive lace tape which I cut up into pieces, so it curved round the circle more easily. I also put a little on the tip to match.


There is a similar tutorial here, It's in Portuguese, but the photos are a good guide and you could use Google Translate if you wish to try this at home. http://ateliedovlady.blogspot.co.uk/2014/04/guarda-chuva-de-papel_25.html

The tag is a rectangle of matching scrapbooking paper matted on black cardstock.
I used a cute edge punch on the sides and stamped a "dream a little dream" sentiment.
The matching flowers I created from my stash and used a "dress it up" button for the centre.


Supplies:
Paper - Docrafts Papermania Sew Lovely
Stamp: Autumn Leaves - Word Flourish
Black adhesive doily/lace tape - Hobbycraft
Heart lace border punch - Hobbycraft


Challenges:
We Love 2 Create -  Anything Creative/Mixed Media 
Craft Stamper - Take a Technique 
Stamps And Stencils - Make it 3D with a Hop 
 Bizzy Bec - Anything Goes

Steampunk Stamping Project

 Today I'm sharing a monochromatic steampunk mixed media piece using a lovely Santoro Willow stamp as my starting point.
Supplies:

Santoro Willow - 6 x6 papers, wooden shapes (birds and cog), Metal cogs and clear stamp.
I stamped the wooden cog and coloured the birds with inks and Pinflair gold Buff It.
I stamped the girl and used the cog stamps for the background along with a few others from my stash.
The key is from the Willow stamp set and is stamped onto gold card and fussy cut out.
Centres of the cogs are various metal brads (Chronology).
Girl's skirt is from a Kanban Steampunk stamp onto vellum.
Time Holtz Distress Inks
Brown Cardstock - Papermania
Gold Edging- gold embossing powder on Versamark

Challenges:
Little Claire Designs - Favourite Stamp (15/11)
Bizzy Bec - Anything Goes (5/11)
We Love 2 Create -  Anything Creative/Mixed Media 

Craft Stamper - Take a Technique
Rubber Dance - October Challenge Colours

Sunday, 4 October 2015

Gilded Lily Castle Card

Today I am sharing a 3D card made with the Gilded Lily Collection by Graphic 45.
This is a beautiful Marie Antoinette and Versailles inspired paper and embellishment collection. There are lots of Madame Pompadour and courtesan vintage illustrations to cut out. There are also 3 matching stamp sets by Hampton Art. It's a great kit for altered art and mixed media projects, as well as traditional card and scrapbooking makes.
  
I loosely based the structure of the card on Deneen Treble's castle template. You can find the template here: 

 The roses are made from the Gilded Lily co-ordinating Patterns and Solids Paper Pad (a must have!) and Tim Holtz Tiny Tattered Floral dies by Sizzix.
These are small dies, which will also fit the Spellbinder's Sapphire. They are so much fun to make, using the included quilling tool, and give a lovely shabby chic rose result.

 The cute bling button is glued onto a piece from the chipboard set and holds an envelope from the Pockets and Tags set. The bling is from a co-ordinating elements kit exclusively by Fotobella. They also do lovely metal trinket packs which they hand-pick to co-ordinate with their Graphic 45 ranges.
 Detail of the back panel, for a personal message. I used the Tim Holz Tattered Florals again in the 3 sizes here and a card from the Gilded Lily journalling card pack.


I also cut out a royal carriage using a Tattered Lace die and added some characters from the paper pad to make a coach fit for a princess. The wheels are gilded with Viva Decor Buff It.

The gentleman was originally holding a cane, so to add some Rococo romance, I gave him a paper bouquet instead!
The tile effect on the roof was achieved with Prima Elementals Stencil in Scales (12") and texture gel. I then coated the gel in Wow Embossing Powder Vintage Romance and heat set. This is a beautiful new powder in a peachy-pink base with gold shimmer. It is similar to Stampendous Shabby Pink Embossing Powder, but is paler with a less glossy finish. I love the Vintage Wow powder range and hope to post some swatches as there are very few online.


 This is the card when laid flat. I could've kept embellishing this card, as it was so much fun to make, but it was for a birthday, so I had to stop! :-)

Supplies:
Graphic 45 Gilded Lily Collection
Wow Embossing Powder - Vintage Romance
Ranger Clear Texture Medium
Prima Elementals 12 x 12 Stencil - Scales
Tim Holtz Tiny Tattered Florals by Sizzix
My Minds Eye - Madison Avenue Lost & Found 6 x 6 Paper Pad - flag
Tim Holtz Distress Ink - Tattered Rose
Pearl ended stick pin for flagpole.

Challenges:
Creative Inspirations - 329 Anything Goes
Live & Love Crafts - 40 Pink
Country View - 32 Add Some Texture
Die Cuttin' Divas -  235 Anything Goes
Papertake Weekly - Take Your Pick
Stamps & Stencils - make it 3D
The Craft Barn - People
Inky Chicks - Think Pink