Urban Mermaid Designs

Sunday 30 April 2017

Chocolate Scented Ink!

NEWSFLASH!
Chocolate scented ink for stamping is now available by Hero Arts!
It's designed for children, but how fun would it be to make chocolate-scented cards.

Here are some ideas for stamps to use with this ink:
My Favourite Things - Chocolate Sentiments


Graphic 45 - Parisian Cafe - 1

Inkadinkado - Eat Cupcakes

Avery Elle

Newton's Nook - Love & Chocolate

Marca- Close to My Heart - A Chocolate Affair

Marianne Designs- Chocolate is the Answer Stamp & Dies Set
My Cute Stamps - Sweet Chocolate

Lora Bailora


Stampin'Up - For the Love of Chocolate Wood-mounted Set
Stamping Bella:


The new scented inks also come in Grape, Strawberry, Orange, Licorice and Lime.


Sunday 23 April 2017

Spring Blooms Tag with UTEE


This week I have created a Spring Blooms tag. I am enjoying experimenting with my embossing enamels, but I only have one silicone mould. I am hoping to get some more as I tried pouring the molten enamel into some of my Prima clear plastic packing that had a cool flower shape and predictably...it melted. Oops, always use silicon or heat-resistant moulds, folks!
I used the feather mould by WOW for the 2 resin feathers and the other feathers are stamped & heat-embossed onto vellum.
I used a Prima stencil and watercolours to create the background on a Prima tag which I had first blended with Colour Clouds.


Then I fussy cut my Prima Princess (Sydney), which I coloured in  using a Spectrum Noir Sparkle pen instead of a brush and water and water-based pastels and watercolours.


I mixed a few colours with the transparent UTEE to get a blended effect. I first lightly dusted the mould with a mica embossing powder to add some extra shimmer.
Close up of UTEE feathers:

I die-cut some blooms with Memory Box and added those:


Supplies:
Heat-resistant vellum
WOW! Feather Mould, 
Melt It ultra thick embossing powder, embossing powders to colour
Sentiment from Kaisercraft Boho Chic 6" pad
Nuvo Drops - Morning Dew
Prima Flowers & Berries
Prima Stencil 6"
Prima Watercolour Tag Pad
Prima Princesses Planner Dividers - Sydney also available as a stamp
Cosmic Shimmer Watercolours - Frosty & Chic
Spectrum Noir Sparkle Pen
Prima Oil Pastels
Seam Binding
Dies: Kaisercraft (Dream Big), Memory Box (Pennington Rose Blossoms), 
Tim Holtz (Garden Greens)

Challenges:
Simon Says - Spring Blooms 25/5
Mixed Media - AG with a twist 12/5

*Scrappy Land - Spring Blooms Dies: Kaisercraft (Dream Big), Memory Box (Pennington Rose Blossoms) Winner


Thursday 20 April 2017

Handmade Easter Egg Box


I have always wanted to have a go at altering a polystyrene egg with decoupage, so I decided to give it a go for Easter. This is how the egg started out!
In the past I have had trouble with glues and media dissolving polystyrene objects, so I watched a few tutorials on Youtube first to make sure I was using the right ones.
My method below is a mix of those and I am sure you will find your own way. The basic rule seems to be any water-based media is fine, e.g. Modge Podge and Acrylic Paints.
I used some damask paper napkins as my base layer. You just use the top layer of the napkin, tear it into pieces and then stick to the egg with Mod Podge.

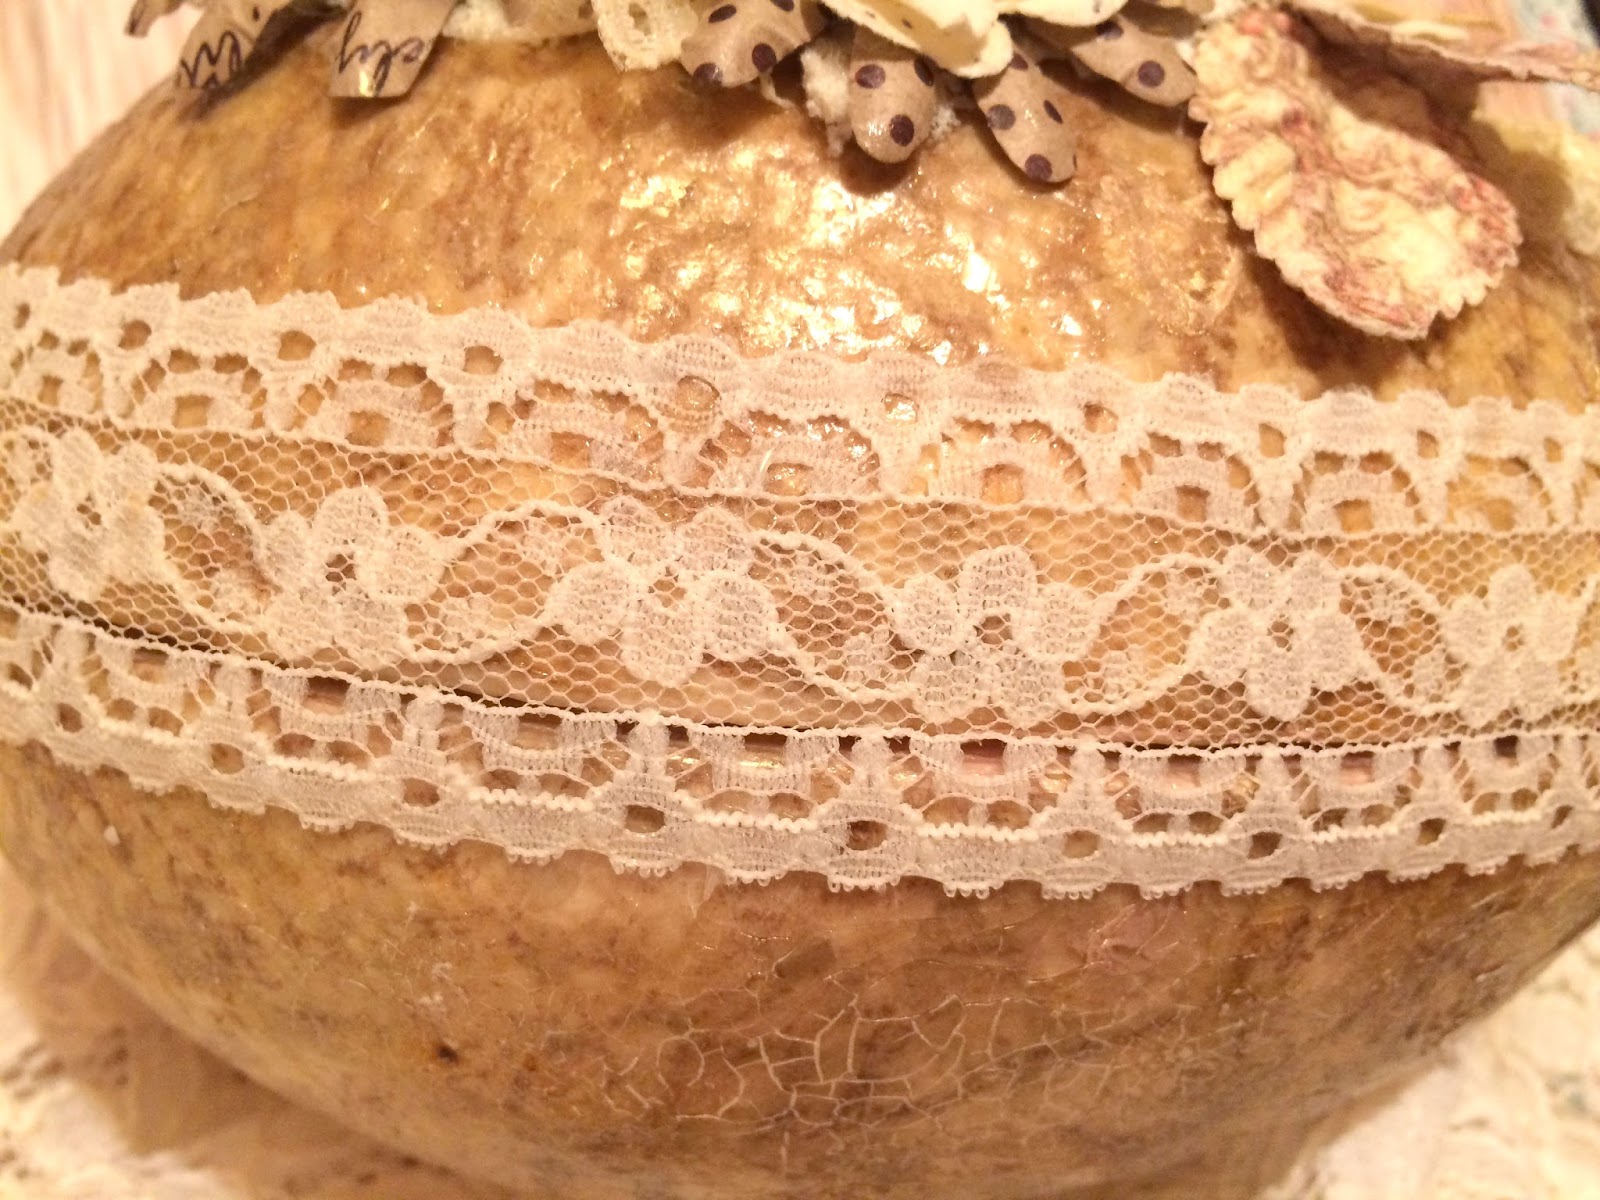
The result was pretty, but too much of the polystrene was showing through. I used a selection of spray misters to colour the egg building up layers until the desired colour was achieved.
To add further interest and a vintage feel I stamped the surface with a script stamp (Marianne - Anja's Text).

I then added a few layers of Ranger Crackle Accents and once dry I used a gilding wax to bring out the cracked details to make it look more like the shell of an egg.

I lined the base with some cream netting and used Prima Opal Magic Rose Gold paint to gild the inside edges.
 
Next came the fun part- decorating the egg. 

I created matching flowers and leaves using mainly Prima flowers and some brads. I stamped a few of the leaves and tinted the petals where needed.


I attached a lace ribbon trim all around the edge of the egg lid, but overlapping, so that it would hide the join.
I also added some netted ribbon and a woven ribbon bow to the back of the egg.


*Emerald Creek - Double Duty - Top 3 Honours
*Happy Little Stampers - Mixed media with Sprays: Favourite
Supplies:
Large Polystyrene Egg Box (Wilkos)
Lace Ribbon
Ranger Crackle Accents
Gilding Wax
Netting
Prima Opal Magic Rose Gold Paint
Ink Sprays : Cosmic Shimmer - Frosty Mink, Prima Bloom - Worn Leather, Lindy's Opal Sea Oats
Prima Flowers & Leaves
Large Script Stamp - Marianne's Anja's Text
Versafine Ink - Sepia
Brads
Mod Podge - Matt
Glue Gun

Challenges:
Craft Heaven - Flowers ends 10/5
Creatalicious AG #113 29/4

Wednesday 19 April 2017

Stamped-All Over Easter Card


I was inspired by the look of some a new home decor trends to create this monochrome, mini-stamped Easter Card. 
I started by sketching a hare freehand onto a large piece of multi-media paper. I used this silhouette I found on Google for reference. If you don't feel comfortable drawing free-hand, you could print out a silhouette and trace it.  

I then assembled all of my mini stamps. I would highly recommend using an acrylic rod or several rather than an acrylic block when working with minis. You can attach a mini stamp to both ends and just stamp directly into the ink pad for speed. You will find that the image builds up really quickly,
CLOSE UP: Hand stamped paper. You build up the image gradually. I couldn't resist hiding a few fairies in with the flowers. 
I mounted the bunny onto some paper and card and then added a bit of bling with a flower I had harvested from an old necklace!

 To finish I highlighted some of the daisy centres with yellow. You could colour in each flower if you wanted, but I was going for a monochrome effect.
I printed the sentiment out and then went round it with a white pen to give a chalkboard effect.

Supplies
White, black A4 card
Mini stamps: various brands incl. Prima, Cardio (Enchanted Garden)
Black stamping ink
Flower embellishment
Rusty Pickle Princess Bride 12" paper
Majestix Acrylic Stamping Rods
White Posca Pen

Challenges
Addicted to Stamps - Not a Square Card + Stamps 16/5

Friday 14 April 2017

CAS Card "Smile" - Feminine

Trying to achieve a CAS - Clean and Simple style card is very challenging for me, but I gave it a shot this week and created this SMILE card.


I was using the Heidi Swapp cut out Roses paper as a stencil for another card and coloured them with Colour Cloud inks. These work better than spray or dye inks for colouring detailed pieces as they have a special formulation which makes them very smooth and easy to blend and are less likely to saturate the paper.


I liked the colour of the blended roses so much that I decided to use them for a card instead.

I heat-embossed the SMILE die cut sentiment with a blend of WOW powders.


I added the butterflies as they went so well with the style of the roses and I needed a dot for the I in smile!


Supplies
6" Square White Card Blank
WOW! Powders in Perissa and Pastel Pink
Colour Cloud in Frosty Blossom and Frosty Mink
Mini Smoothie Sponge
Heidi Swapp Mixed Media Lace Papers
White die cut butterflies
Kaisercraft Collectables Breeze "Smile" die cut

Inspired by these Challenges
Creative Embellishments - Spring - inspired by spring blossoms that make me smile 30/4

CAS Card "Smile" - Masculine

This is my second CAS card this week. This time with a more masculine vibe.


I started with an 6" card blank in square and used new Prima Rose Quartz paper as a backing.

I heat-embossed the sentiment for a metallic industrial finish.


The silver brads are actually Viva Decor liquid pearls. I recommend dropping them on acetate first, letting them dry then adhering them to your project, rather then squeezing directly onto your card.This way you can choose the best ones, or in this case, the ones which were equal in size.


Supplies
6" Square White Card Blanks
WOW! Powder in Champers
Viva Decor Pearl Pen in Chrome
Prima Rose Quartz 6" Paper Pad
Project Life Mini Kit paintable card 3" x 4"